2023 TCP 첫 스터디, 웹 프론트 엔드
1주차. 타이머 만들기
javascript
html, css, javascript 를 동시에 사용하여 어떤 프로젝트를 해보는 것은 이번이 처음이다. 사실 처음에 엄청 막막했다. 뭐부터 시작해야 할까? html 으로 뼈대를 만들고, css 로 디자인을 살짝 해 준 후에, 각 버튼과 시간을 나타내는 레이블이 상호작용하며 내가 원하는 동작을 해주도록 javascript 로 프로그래밍을 해주어야 하는데. 되는 대로 관련 유튜브 영상을 찾아보기 시작했다. 자바스크립트 중급 강좌 #12 setTimeout / setInterval
이렇게 유튜브, 용래 선배가 깃허브에 남겨주신 자료들, 경준 오빠의 직접적인 도움 등으로 다행히 프로젝트를 나름 마무리 지어 보았다.
프로젝트를 진행하면서 마주친 장애물들
첫 번째
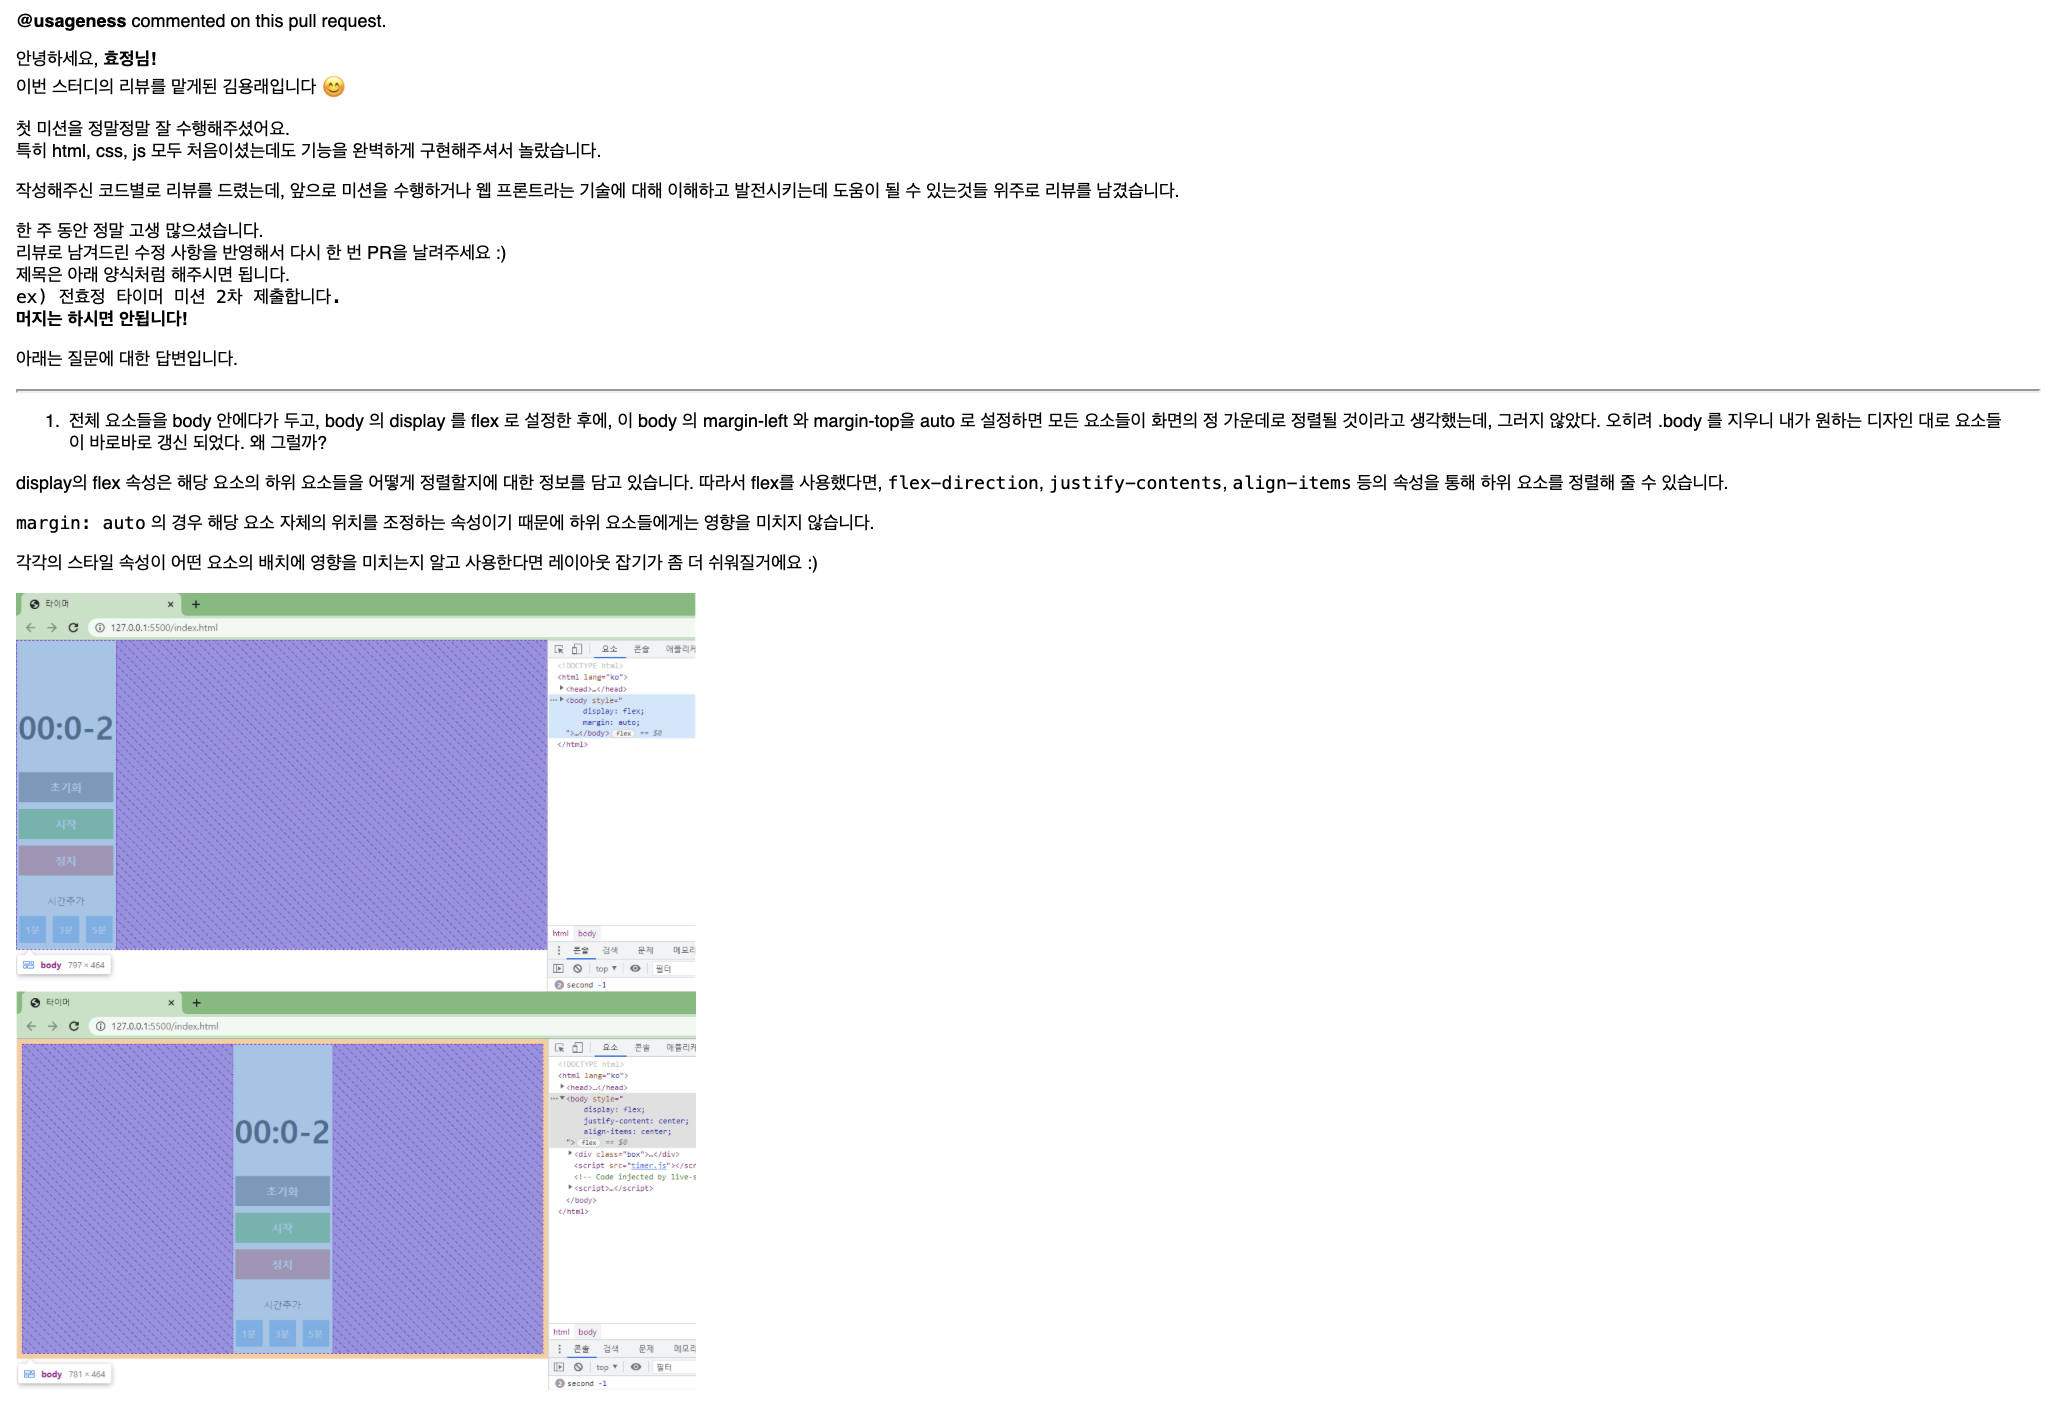
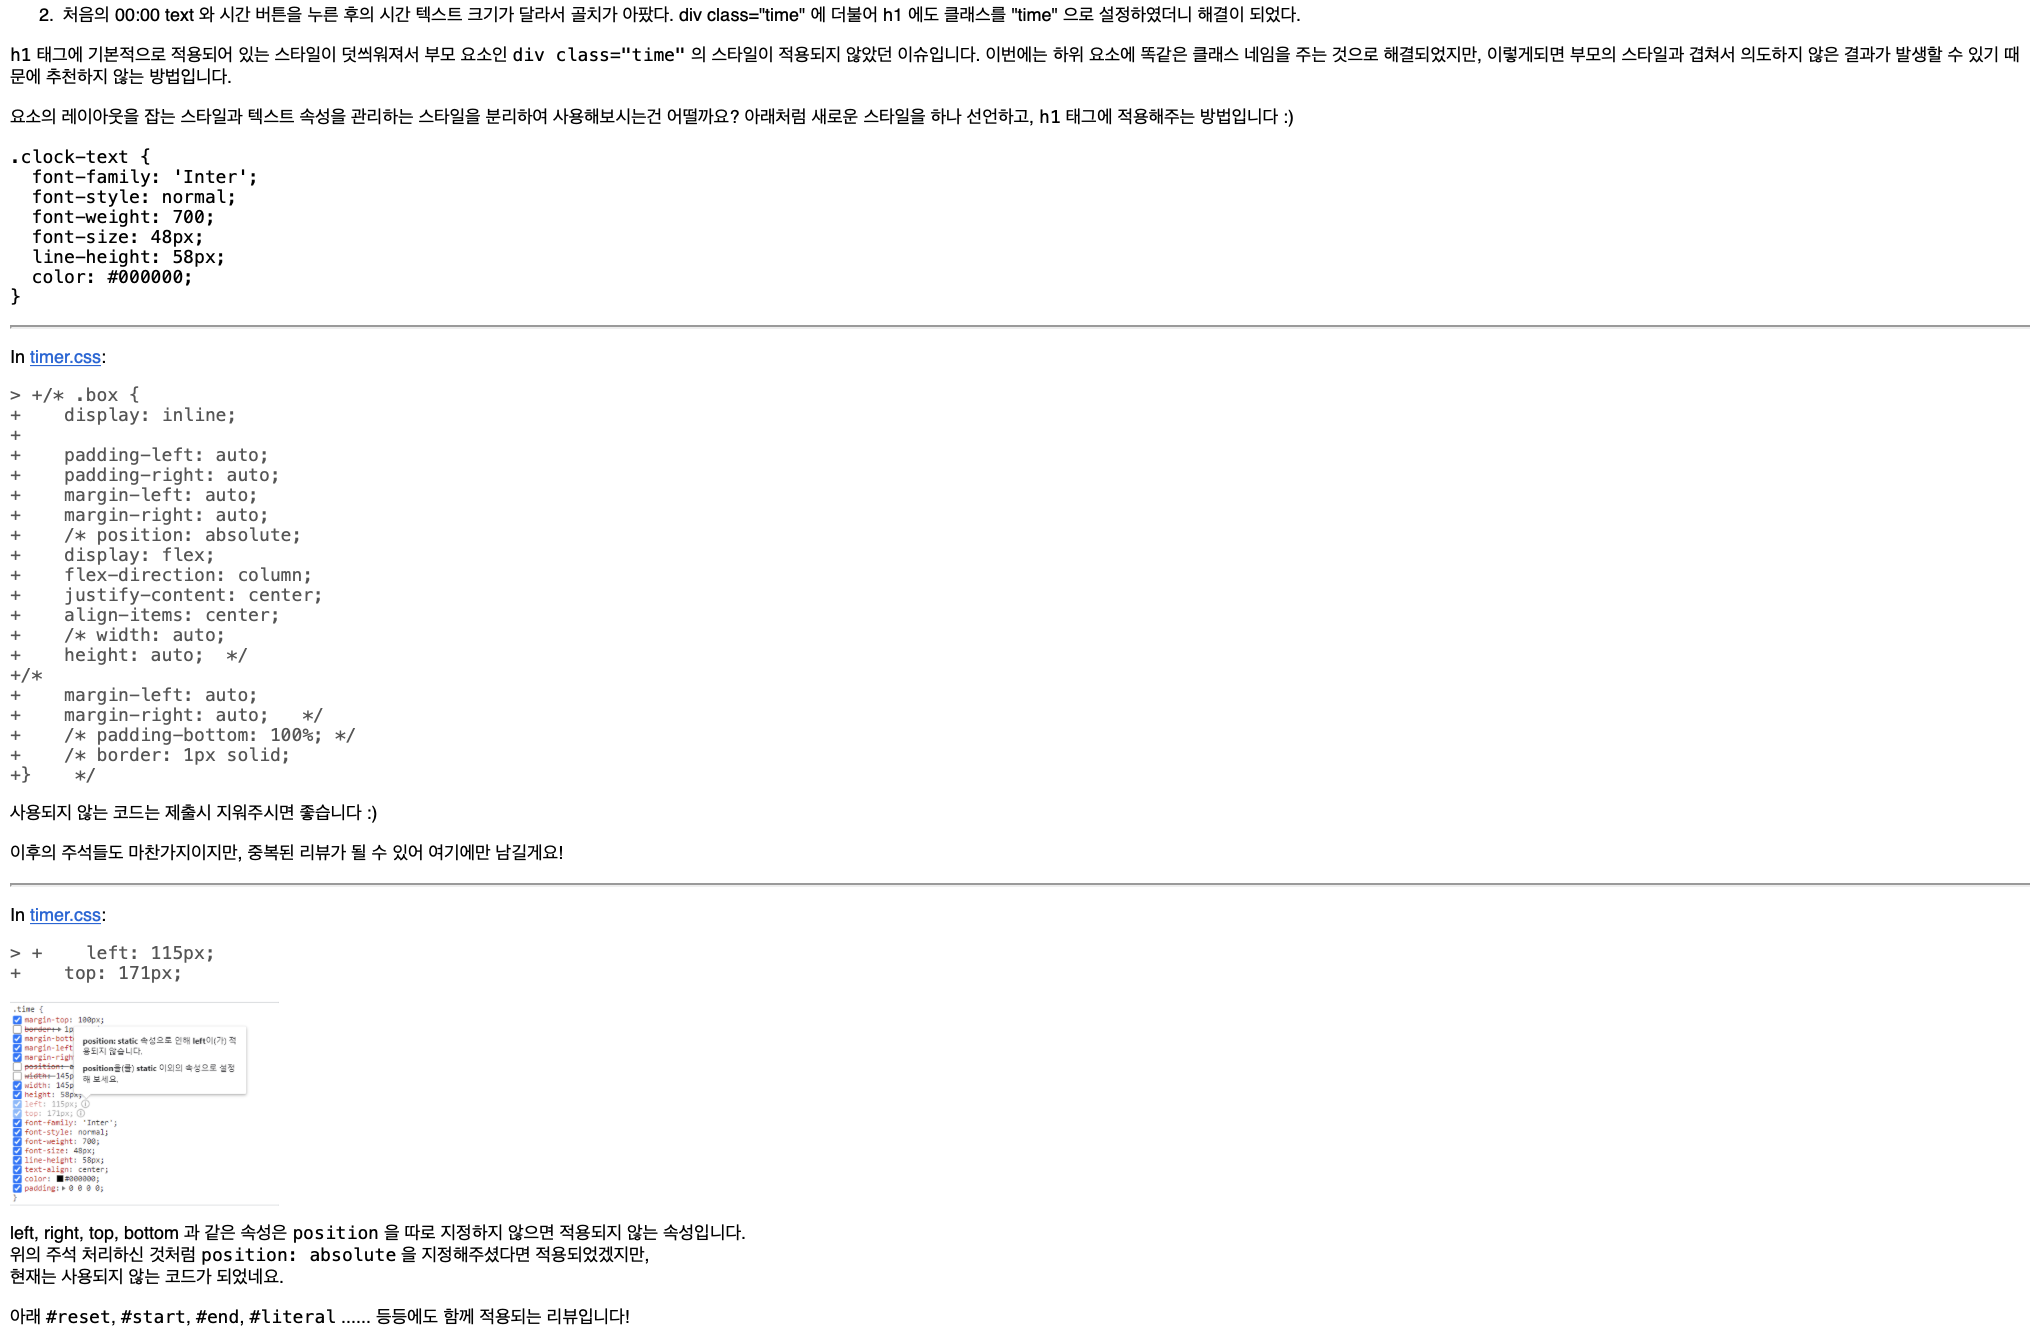
전체 요소들을 body 안에다가 두고, body 의 display 를 flex 로 설정한 후에, 이 body 의 margin-left 와 margin-top을 auto 로 설정하면 모든 요소들이 화면의 정 가운데로 정렬될 것이라고 생각했는데, 그러지 않았다. 오히려 .body 를 지우니 내가 원하는 디자인 대로 요소들이 바로바로 갱신 되었다. 왜 그럴까? 처음의 00:00 text 와 시간 버튼을 누른 후의 시간 텍스트 크기가 달라서 골치가 아팠다. div class=”time” 에 더불어 h1 에도 클래스를 “time” 으로 설정하였더니 해결이 되었다.
두 번째
javascript 에서 필요했던 함수들: javascript 는 다루어 본 적이 없어서 처음에 시작할 때 굉장히 난감했다. 하지만 용래 선배가 깃허브에 남겨주신 자료들과 따로 유튜브, 구글 등을 찾아본 결과
const value = document.querySelector('.time');
const btns = document.querySelectorAll(".btn");

btns.forEach();
btn.addEventListener("click", function(e));
그리고 타이머를 구현할 때 필요한 ‘시간’과 관련된 함수들인
setInterval();
setTimeout();
clearInterval();
를 사용해야 함을 알게 되었다.
setInterval 함수는 특정 시간마다 특정 함수를 반복하고
setTimeout 은 특정 시간 후에 특정 함수를 실행하고
clearInterval 은 setInterval 함수를 끝낸다.
처음 보는 문법이 낯설게만 느껴졌지만, 다행히 유튜브나 경준 오빠의 도움으로 잘 해결해 나갈 수 있었다.
세 번째
분과 초로 나누어진 시간에 대해서 따로 따로 변수를 준비하는 것이 아닌, 초에 대한 변수인 second 만으로 문제를 해결했다. 분은 parseInt(second/60) 으로, 초는 parseInt(second%60) 으로 나타낼 수 있다. setInterval() 함수를 쓰는 것이 어렵게만 느껴져서 처음에 삽질을 참 많이 했었는데, 이 함수 안에 clearInterval 이 담긴 종료 조건을 함께 넣어 주어야만 내가 원하는 결과를 얻을 수 있다는 사실을 깨달았다.
네 번째
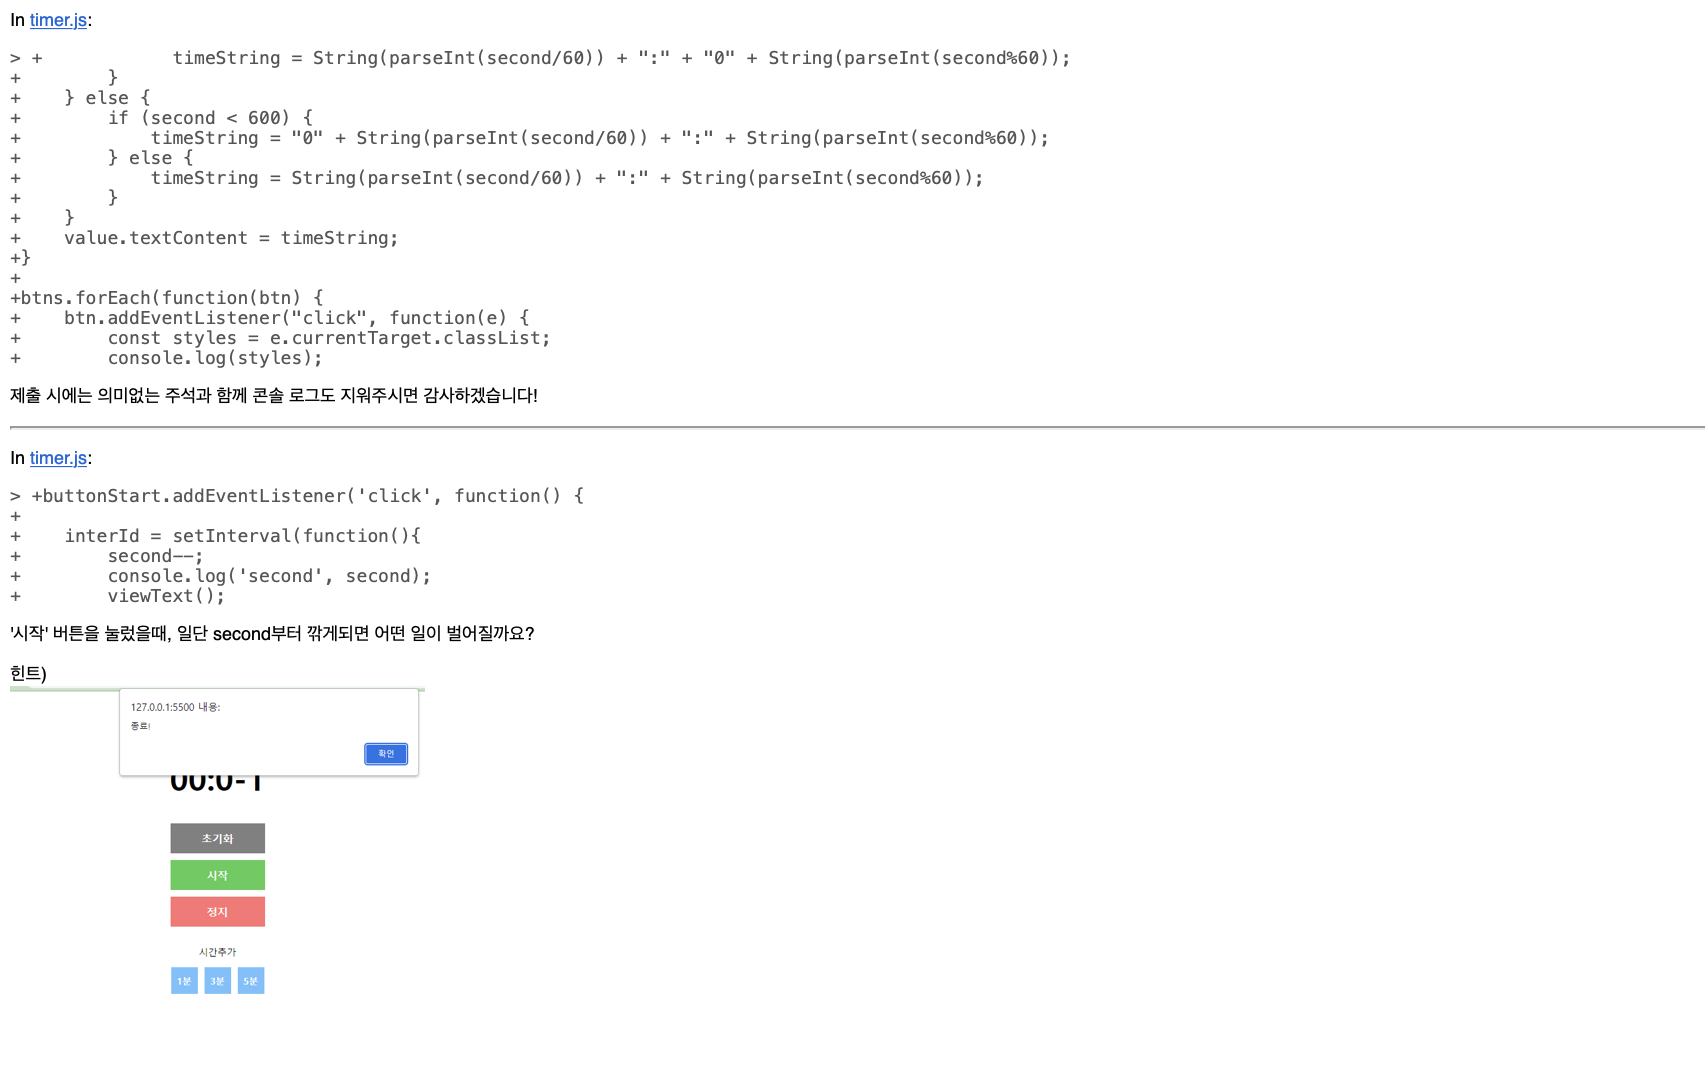
코딩 중간에 [초기화] 기능이 있으면 더 좋을 것 같다는 생각이 들어 초기화 버튼을 따로 만들게 되었다. 가장 마지막에는 [종료!] 라는 경고메세지가 뜰 때 00:00 이 화면에 나타나는 것이 아니라 00:01 이 나타나는 문제가 있었다. 종료 조건 안에 바로 alert(‘종료!’) 를 넣는 것이 아니라, alert(‘종료!’) 를 setTimeout 함수에 넣고, 이를 종료 조건에 넣는 것으로 해결하였다.
html, css, javascript 중에서 css가 다루기 가장 쉬울 것이라고 예상했었는데, 오히려 이중에서 css가 가장 어려웠다.
용래 선배의 피드백
이렇게 해서 과제를 제출했는데, 용래 선배님으로부터의 피드백이 왔다. 정말 처음부터 끝까지 세세하게, 꼼꼼하게 피드백을 달아주셨다. 이렇게까지 열심히 해주실 줄이야, 감동을 받았다. 괜히 실력자가 아니구나.. 싶었다. 나도 실력자가 되면 후배들한테 봉사하는 마음으로, 성심성의껏 내가 아는 개발 지식을 알려줘야지.
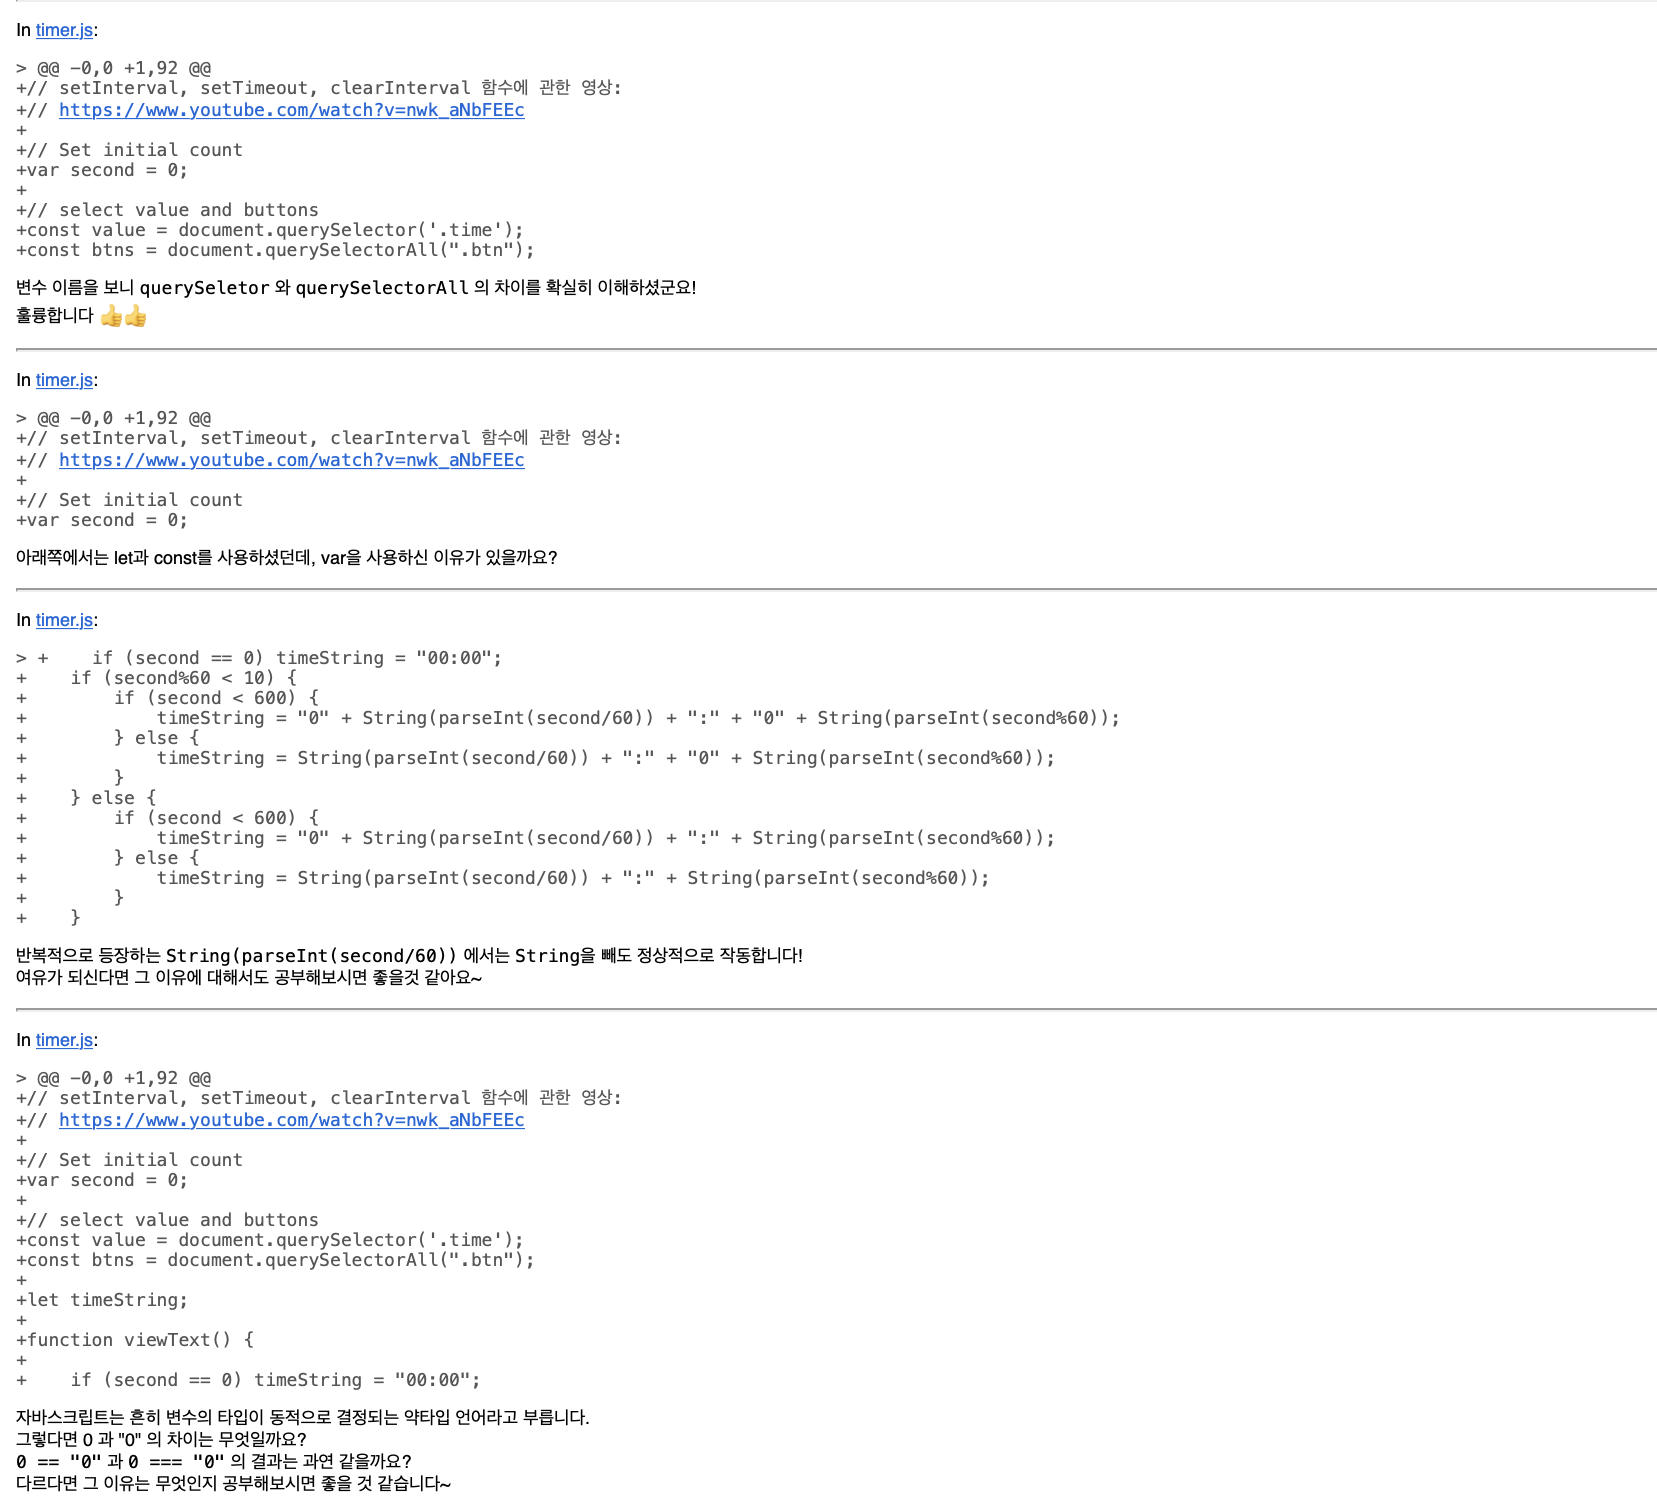
querySelector와 querySelectorAll의 차이점
사실 이해를 완전하게 하지는 못했다. querySelector와 querySelectorAll의 차이에 따르면, querySelector()는 지정된 선택자와 일치하는 도큐먼트의 첫 번째 element를 반환한다. 일치하는 요소가 없으면 null을 반환한다. 반면, querySelectorAll()은 지정된 셀렉터 그룹에 일치하는 도큐먼트의 element list를 나타낸다. 즉 NodeList를 반환한다. 지정된 셀렉터가 없는 경우에는 비어있는 NodeList로 반환된다.
let 과 const, 그리고 var 의 차이점
let 과 const, 그리고 var 의 차이점은 무엇일까?
let과 const, 그리고 var의 차이점에 따르면,
var은 변수를 한 번 더 선언해도 에러가 나오지 않는다.
예를 들어,
var name = "jun";
console.log(name);

var name = "joon";
console.log(name);
가 가능하다.
유연한 변수 선언으로 간단한 테스트에는 편리하겠으나, 코드량이 많아 진다면 어디에서 어떻게 사용될지도 모를 뿐더러 값이 바뀔 우려가 있다.
이를 보완하기 위해 추가된 변수 선언 방식이 let과 const이다.
let name = "jun";
console.log(name);

let name = "joon";
console.log(name);
name이 이미 선언 되었다는 에러 메세지가 나온다. 변수 재선언이 되지 않는다.
let과 const의 차이점은 무엇이겠는가?
let은 변수에 재할당이 가능하다.
let name = "jun";
console.log(name);

name = "joon";
console.log(name);
하지만, const는 변수 재선언, 변수 재할당 모두 불가능하다.
const name = "jun";
console.log(name);

name = "joon";
console.log(name); // 에러.
호이스팅에 관한 내용 또한 위의 블로그를 참고하여 알아보면 좋겠다.
약타입 언어
약타입 언어와 강타입 언어의 차이는 무엇일까?
강타입과 약타입은 형변환을 기준으로 구분된다.
강타입 언어는 다른 형끼리의 변환이 금지되어 있고, 만약 변환을 하고 싶다면 명시적으로 타입을 선언해 주어야 한다(자료형이 맞지 않을 시 에러 발생).
약타입 언어는 다른 형끼리의 변환이 가능하며, 심지어 암묵적으로 변환을 해주기도 한다.
구체적인 예시는, 위의 블로그를 참고하길 바란다.
0 == “0” 과 0 === “0” 의 차이
자바스크립트에서 == 과 === 의 차이가 무엇일까?
==과 ===의 주된 차이점:
숫자를 숫자 리터럴, 즉 0을 “0”과 비교하면, == 는 true 를, === 는 false 를 반환한다.
===는 값뿐만 아니라 두 변수의 유형도 확인하므로 0과 “0”의 유형이 같지 않으므로 false를 반환하는 것이고, ==는 변수 값을 기반으로 유형을 수정하기 때문에 true를 반환하는 것이다.
피드백을 수용한 2차 제출
html
<!DOCTYPE html>
<html lang="ko">
  <head>
    <meta charset="UTF-8" />
    <link rel="stylesheet" href="timer.css">
    <title>타이머</title>
  </head>
  <body style="
    display: flex;
    justify-content: space-between;
    align-items: center;
  ">
    <div class="box">
      <div>
          <h1 class="clock-text">00:00</h1>
      </div>
      <div class="button">
          <button id="reset">초기화</button>
          <button id="start">시작</button>
          <button id="end">정지</button>
      </div>
      <p id="literal">시간추가</p>
      <div class="setting">
        <button class="btn one">1분</button>
        <button class="btn three">3분</button>
        <button class="btn five">5분</button>
      </div>
    </div>
    <script src="timer.js"></script>
  </body>
</html>
css
.clock-text {
/_ 05:00 _/

    position: absolute;
    width: 145px;
    height: 58px;
    left: 115px;
    top: 150px;

    /* 여기서 초기화 버튼과 떨어지려면 어떻게 해야할까? */
    font-family: 'Inter';
    font-style: normal;
    font-weight: 700;
    font-size: 48px;
    line-height: 58px;
    /* identical to box height */
    text-align: center;

    color: #000000;

}

.button {
display: flex;
flex-direction: column;
justify-content: space-evenly;
}

#reset {
 border: 0;
position: absolute;
border: 0;

    width: 142px;
    height: 45px;
    left: 118px;
    top: 249px;
    background: gray;


    /* 초기화 */
    font-family: 'Inter';
    font-style: normal;
    font-weight: 700;
    font-size: 16px;
    line-height: 19px;
    text-align: center;
    color: #FFFFFF;

}

#start {
border: 0;
position: absolute;
/_ Rectangle 2 _/

    /* position: absolute; */
    width: 142px;
    height: 45px;
    left: 118px;
    top: 303px;
    background: #4FCC54;


    /* 시작 */
    font-family: 'Inter';
    font-style: normal;
    font-weight: 700;
    font-size: 16px;
    line-height: 19px;
    text-align: center;
    color: #FFFFFF;

}

#end {
border: 0;
position: absolute;

    width: 142px;
    height: 45px;
    left: 118px;
    top: 357px;

    background: #FF7373;

    /* 정지 */
    font-family: 'Inter';
    font-style: normal;
    font-weight: 700;
    font-size: 16px;
    line-height: 19px;
    text-align: center;

    color: #FFFFFF;

}

#literal {
border: 0;
position: absolute;

    width: 56px;
    height: 17px;
    left: 161px;
    top: 424px;

    margin-bottom: 5px;

    font-family: 'Inter';
    font-style: normal;
    font-weight: 500;
    font-size: 14px;
    line-height: 17px;
    /* identical to box height */
    text-align: center;

    color: #000000;

}

.setting {
 display: flex;
flex-direction: row;
justify-content: center;
align-items: center;
}

.one {
border: 0;
position: absolute;
width: 40px;
height: 40px;
left: 118px;
top: 452px;

    background: #71C2FC;

    margin-top: 5px;
    /* 1분 */
    font-family: 'Inter';
    font-style: normal;
    font-weight: 700;
    font-size: 14px;
    line-height: 17px;
    /* identical to box height */
    text-align: center;

    color: #FFFFFF;

}

.three {
border: 0;
position: absolute;
width: 40px;
height: 40px;
left: 169px;
top: 452px;

    background: #71C2FC;

    margin-top: 5px;
    /* 3분 */
    font-family: 'Inter';
    font-style: normal;
    font-weight: 700;
    font-size: 14px;
    line-height: 17px;
    /* identical to box height */
    text-align: center;

    color: #FFFFFF;

}
.five {
border: 0;
position: absolute;
width: 40px;
height: 40px;
left: 220px;
top: 452px;

    background: #71C2FC;

    margin-top: 5px;
    /* 5분 */
    font-family: 'Inter';
    font-style: normal;
    font-weight: 700;
    font-size: 14px;
    line-height: 17px;
    /* identical to box height */
    text-align: center;

    color: #FFFFFF;

}
javascript
// Set initial count
let second = 0;

// select value and buttons
const value = document.querySelector('.clock-text');
const btns = document.querySelectorAll(".btn");

let timeString;

function viewText() {

    if (second == "0") timeString = "00:00";

    if (second%60 < 10) {
        if (second < 600) {
            timeString = "0" + parseInt(second/60) + ":" + "0" + parseInt(second%60);
        } else {
            timeString = parseInt(second/60) + ":" + "0" + parseInt(second%60);
        }
    } else {
        if (second < 600) {
            timeString = "0" + parseInt(second/60) + ":" + parseInt(second%60);
        } else {
            timeString = parseInt(second/60) + ":" + parseInt(second%60);
        }
    }
    value.textContent = timeString;

}

btns.forEach(function(btn) {
btn.addEventListener("click", function(e) {
const styles = e.currentTarget.classList;
console.log(styles);
if (styles.contains("one")) {
second += 60;
} else if (styles.contains("three")) {
second += 180;
} else {
second += 300;
}

        viewText();

    })

})

const buttonStart = document.querySelector('#start')

let interId;

buttonStart.addEventListener('click', function() {

    interId = setInterval(function(){
        console.log('second', second);
        second--;
        viewText();

        if (second <= 0) {
            viewText();
            clearInterval(interId);

            setTimeout(function() {
                alert('종료!');
            }, 1000);
        }
    }, 1000);

})

const buttonStop = document.querySelector('#end');

buttonStop.addEventListener('click', function() {
clearInterval(interId);
viewText();
})

const buttonReset = document.querySelector('#reset');

buttonReset.addEventListener('click', function() {
clearInterval(interId);
second = 0;
viewText();
})
발견한 오류 하나!
시작 버튼을 계속 누르면, 줄어드는 시간의 속도가 점점 빨라진다. 이것을 어떻게 해결하면 좋을까?
마우스 중복 클릭을 막는 방법을 참고해 보면, this.setAttribute("disabled", "disabled");를 사용하면 된다는 사실을 알 수 있다.
따라서, javascript 코드에서
buttonStart.addEventListener("click", function () {
  this.setAttribute("disabled", "disabled"); // 코드 추가 완료.
  interId = setInterval(function () {
    console.log("second", second);
    second--;
    viewText();

    if (second <= 0) {
      viewText();
      clearInterval(interId);

      setTimeout(function () {
        alert("종료!");
      }, 1000);
    }
  }, 1000);
});
를 수정해주니, 내가 원하는 대로 결과가 나왔다. 하지만 여기까지만 수정한다면 더이상 타이머에서 ‘시작’ 버튼을 사용할 수 없게 된다. 그러므로, 타이머에서 시간이 줄어드는 과정 중에는 ‘시작’ 버튼을 disable 로 해두었다가, 타이머가 00:00 이 되거나 초기화/정지 버튼을 눌렀을 때는 disable 상태를 풀어 ‘시작’ 버튼을 사용할 수 있게 만들어야 한다.
disable 상태를 해제하는 방법 에 따라, .removeAttribute('disabled');를 사용하면 된다는 사실을 알 수 있다.
buttonStart.addEventListener('click', function() {
    this.setAttribute("disabled", true);  ** 여기!!! **

    interId = setInterval(function(){
        console.log('second', second);
        second--;
        viewText();

        if (second <= 0) {
            viewText();
            clearInterval(interId);

            setTimeout(function() {
                alert('종료!');
            }, 1000);
            this.removeAttribute("disabled");  ** 여기!!! **
        }
    }, 1000);

})

const buttonStop = document.querySelector('#end');

buttonStop.addEventListener('click', function() {
    buttonStart.removeAttribute("disabled");   ** 여기!!! **
    clearInterval(interId);
    viewText();
})

const buttonReset = document.querySelector('#reset');

buttonReset.addEventListener('click', function() {
    buttonStart.removeAttribute("disabled");   ** 여기!!! **
    clearInterval(interId);
    second = 0;
    viewText();
})
이로써 수정이 모두 완료 되었다.
